There are many different ways you can build a smart mirror with a variety of parts and sizes. The parts listed on this page are based on my research as I built my smart mirror. You can use these parts recommendations as your starting point for your research, or you can copy what I did for your own build.
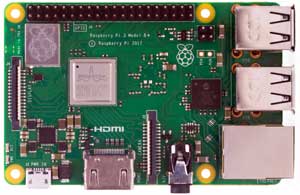
Raspberry Pi
The Raspberry Pi is the brain for your smart mirror. While you can use an Android device to run your smart mirror, the most popular option is to use a Raspberry Pi. These devices are cheap and more than powerful enough to run most smart mirrors.
The Raspberry Pi has an HDMI output, which is perfect for most modern monitors. If your monitor doesn’t have an HDMI input, you can buy a cheap adapter to suit your monitor.
The current version I recommend is the Raspberry Pi 3 B+. I recommend buying a starter kit, which contains a case, microSD card, power supply, and heat sinks. While you could buy all of these parts separately, it’s easier to buy a kit containing everything you need. Check out this full RPi 3 B+ Kit here for price and details on Amazon.
The Raspberry Pi 3 B+ has a lot of features, but these are the most important for a smart mirror:
- Built in WiFi & Bluetooth
- Full-size HDMI
- 4x USB 2.0 ports
Built in WiFi is crucial to connect your smart mirror to the Internet. If you decide to buy an older Raspberry Pi that doesn’t have built-in WiFi, you can buy a cheap USB WiFi antenna.
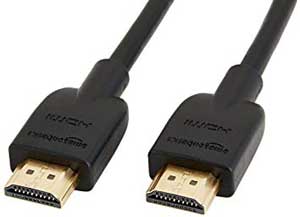
HDMI Cable
If your monitor has an HDMI input, grab yourself a short HDMI cable to connect it to your Raspberry Pi. Get the smallest cable possible so you don’t need to deal with messy cables behind the mirror. Check out these HDMI cables under 4ft for price and details on Amazon.
If your monitor doesn’t have an HDMI input, you’ll need an HDMI to DVI or D-SUB adapter. The monitor I used for my smart mirror didn’t have an HDMI input, so I bought a cheap adapter that works perfectly fine.
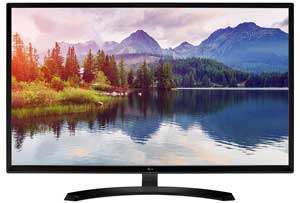
Monitor
If you don’t have an old monitor you can use or you don’t want to buy a second-hand one, there are plenty of inexpensive monitors available that will do a perfectly fine job. I decided to buy a new monitor for my PC and used my old one for my smart mirror.
Here are a few different models of different sizes to check out:
- 20″ monitor with inbuilt speakers
- 24″ monitor with inbuilt speakers
- 27″ monitor with inbuilt speakers
- 32″ monitor (this is what I bought as an upgrade for my PC)
Don’t worry about getting a 4K monitor or one with fancy features such as a high refresh rate. Even the best monitors don’t look very good in smart mirrors. The point of the monitor isn’t to display fantastic photos or videos – you’re more likely to only display text and simple graphics.
Glass / Two-Way Mirrors
This is an important part for your smart mirror. You have a few choices for materials here and the right choice for you depends on the size of your mirror and the quality you want it to have.
Two-way Plexi-glass
The first option is to buy a sheet of two-way plexi-glass. This plastic sheet is suitable for small smart mirrors. The advantage to plexi-glass is it’s quick and easy to use to build a smart mirror. Simply pop the plexi-glass into a frame, mount the monitor behind it and attach the Raspberry Pi.
The downside to plexi-glass is due to distortion. While the plastic can be quite thick, it will slightly bend and warp the reflected image. If there’s any pressure on the sheet from the monitor or frame, you might end up with a carnival fun house mirror.
This acrylic sheet (on Amazon) comes in a lot of different sizes as well as different thicknesses. I recommend getting the maximum thickness to help avoid distortion. The good thing with these sheets is you can cut them down to your exact size requirements.
Two-way Glass
This option is the most expensive, but will give you the best results. A professionally made two-way mirror can look fantastic as a smart mirror. You can get one custom made for any size you want with the exact reflection quality you need.
This two-way glass on Amazon comes in a few different sizes: 12″ x 12″, 12″ x 24″, 18″ x 24″, 24″ x 36″.
If you’re after the best results, it’s hard to go past two-way glass. You’ll get the best finish and reflection compared to acrylic or films.

Regular Glass with Reflective Film
This option gives you better results than plexi-glass and doesn’t cost anywhere as much as getting an actual two-way mirror. With this option you buy a regular pane of glass, then stick a reflective film on one side of the glass, turning it into a mirror. The film will reflect light from one direction and pass light through from the other direction.
The advantage to this option is you end up with a nice glass surface for your mirror. The disadvantage is that you need to accurately apply the film to the glass without any imperfections or else you’ll see those imperfections in the mirror’s reflection.
This is the option I chose for my large bathroom smart mirror. A 55 x 30″ pane of toughened glass with pre-drilled holes for stand-off clips cost me $250. The sheet of reflective film cost $20. The same size mirror bought as a two-way mirror would have cost me well over $1000.
Check out this film on Amazon that comes in many different sizes. The good thing about buying a large sheet of film is you can easily cut it to the exact size you want. If you’re building a borderless smart mirror, you can even experiment with cutting the film in different ways to achieve different mirror borders.

Brackets and Mounting Hardware
Unless you’re making a small smart mirror that will stand on a table, you’ll need a way to secure it to a wall. There are a few different options depending on the size of your smart mirror and the overall weight.
Stand-off Clips for Frameless Mirrors
The most common way of building a smart mirror is to mount the mirror in a frame. Framed mirrors can look fantastic, but they’re not the only option. I chose to build a frameless smart mirror as frameless mirrors tend to look great in bathrooms.
To mount a frameless mirror, you need a way to clamp the mirror to your frame. This can be done with clips that grab the edge of the mirror, or with something called stand-off clips or brackets. The advantage of using stand-off clips is it gives you a nice edge to your mirror. When combined with an LED strip, this can be an incredibly effective way of adding some unique lighting to your smart mirror.
Check out these standoff mounts (on Amazon) with a few different size options. These require holes in your mirror to screw through. Alternatively, you can use standoff clips like these that grab the edge of the mirror.

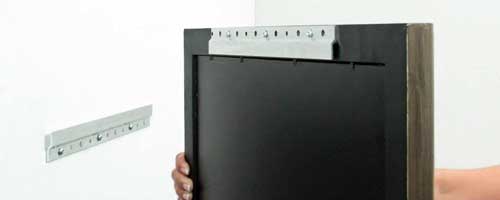
French Cleat
Small smart mirrors can hang on a wall with standard wall hanging brackets. But if you have a large mirror or are worried that small brackets won’t be strong enough, use a French cleat.
A French cleat is an incredibly strong bracket that can easily support the heaviest of mirrors. These aluminum French Cleat hangers (on Amazon) are available in 6″, 12″, 18″, or 30″. With holes every 4″, it gives you plenty of strength to securely hang your smart mirror.
Extra Hardware for Smart Mirror Features
The above parts cover the main functions of a smart mirror (plus frame materials).
PIR Motion Sensor
Having your smart mirror run 24/7 whether there’s somebody in the house or not isn’t smart. A $10 motion sensor is all it takes to detect when somebody is in the area and can turn the monitor on/off as needed.
The best smart mirrors don’t need you to manually turn them on and off. To truly be a ‘smart’ mirror, the mirror should only turn on when there’s somebody in the room, then turn off when there’s nobody around.
I highly recommend building a smart mirror with a motion sensor. It seriously steps up the quality of the mirror from the perspective of visitors to your home when they see your smart mirror come to life when they step into the room.
Check out this small PIR motion sensor on Amazon that works perfectly with a Raspberry Pi. The detection range is rated to around 7 meters, which is more than enough for a smart mirror.

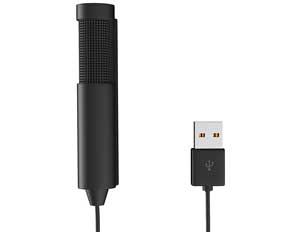
Microphone
While a lot of people like the idea of having a touch screen smart mirror, I personally feel that voice commands are far more practical and useful.
All you need is a cheap microphone and speaker and you can integrate Alexa or Google Assistant into your mirror. If you already use one of these smart home platforms, it’s a no-brainer to turn your smart mirror into a compatible device.
I recommend a mini USB microphone like this one on Amazon. Being USB, you can simply plug it directly into your Raspberry Pi. This type of microphone allows you to glue or mount it to any position in your frame.
Touch Screen
Smart mirrors become far more valuable when you’re able to interact with them. While I prefer voice commands (to keep grubby fingers off of my mirror), you may prefer touch capability.
Depending on the size of your mirror, adding touch capability could be quick and cheap, or impossible.
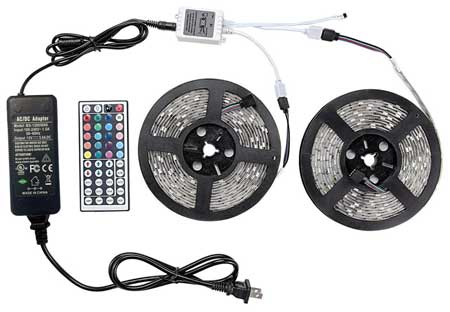
LED Strip
A touch of custom lighting can make a big difference to your smart mirror. A simple RGB LED strip running around your smart mirror can give your mirror some nice ambient lighting. Adding a LED strip to my bathroom smart mirror was the best decision I made. I highly recommend adding some form of lighting to your smart mirror so it stands out.
LED strips come in non-waterproof versions or waterproof versions. If your smart mirror will be in a bathroom, get the waterproof version.
Check out this LED strip kit with power supply with options for waterproof or non-waterproof.